|
ESL Forum:
Techniques and methods
in Language Teaching
Games, activities
and teaching ideas
Grammar and
Linguistics
Teaching material
Concerning
worksheets
Concerning
powerpoints
Concerning online
exercises
Make suggestions,
report errors
Ask for help
Message board
|
ESL forum >
Concerning worksheets > REDUCING SIZE of PICTURES - TUTORIAL + embed fonts
REDUCING SIZE of PICTURES - TUTORIAL + embed fonts
|

moravc

|
REDUCING SIZE of PICTURES - TUTORIAL + embed fonts
|
Hello,
I would like to help new members (and computer newbies) to overcome problems with pictures, so here are few tricks and tips:
1.resize pictures BEFORE you insert the pics into the Word document
2. use batch resizing - eg http://www.pixelapp.com/Free-Photo-Converter.htm
3. this software resizes hundreds of pics of one folder in few seconds :-D
4. use resized pictures and insert them into Word document by Menu - INSERT - Picture. DO not copy pics from net directly to Word document - they may disappear
5. Pictures move? Prevent this by GROUPING ALL PICS in your document
Click on pic number 1, hold CTRL and leftclick on the rest of pics and then rightclick and choose GROUPING, your WORKSHEET will NOT be MESSY then
6. all pics will stick together and move like one big picture, BUT they stay editable and can be "set free"="de-grouped" again...
7. If you use resized pics, you can meet the limit 300 kB all the time and you can share worksheets consisting of 5-10 pages of pics with no problems
PLEASE resize your pics, you can save much space in your and our comps ... :-D
*8. If you want, you can draw your own pics in Word / POWERPOINT, just insert a Painting canvas and work within the canvas, so all your pics can be grouped / resized / blackwhited / outlined within 5 seconds...
YOU CAN GROUP ALL PARTS BY MOVING MOUSE DIAGONALLY (all parts selected) and then group them...
http://kkc.k12.hi.us/tutorials/draw/index.htm
http://www.projectwoman.com/articles/04worddrawing.htm
PS 1: please embed all unusual fonts into your document - Menu - Tools - Options - Save Tab - check Embed TRUE TYPE fonts - OK. Not all computers have the same fonts. If you don �t do embedding, the font changes to the plain fonts...
PS 2: embedding fonts for users of WORD 2007
1. CLICK MS OFFICE BUTTON on the left - choose "WORD OPTIONS" - select SAVE TAB on the left
2. PRESERVE FIDELITY - choose your DOCUMENT and then
3. check the box for "EMBED FONTS IN THE FILE" and "EMBED ONLY CHARACTERS USED in doc"
4. and SAVE your document AS a DOCUMENT WORD 2002 so you can share it at ESLPRINTABLES
|
21 Sep 2009
|
|
|
|

SueThom

|
This sounds like very good info. I �m going to have to try it out. Thanks so much!
Sue
|
21 Sep 2009
|
|
|

Silvia33

|
|
Dear friend
for this great tip.
Silvia |
21 Sep 2009
|
|
|

Missy

|
|
on behalf of all of us "newbies" thanks. I am so impressed with the quality on this website. |
21 Sep 2009
|
|
|

monicap_87

|
Thanks a lot.....!!!!
I really didn �t get the embedding part.... where do I do that?
THAAAAAAAAANKS 
|
21 Sep 2009
|
|
|
moravc
|
- Before you save the Word document - if you used FANCY fonts, and want them to "stay"
- Go to the Tools menu.
-
Then select Options.
-
Select the Save tab.
-
Check the box that says Embed true type fonts. Do not save ordinary Fonts.
-
Click OK.
- Your fancy fonts will be saved in your file, so anybody opens your wss, s/he will see the wss unchanged.
- This works for True Type fonts only. Some fonts are extremely heavy, so the size of the documents is much bigger after embedding (+100 kB)
Hope it �s clear.
For newbies: write all tips, follow up activities etc IN the document and state your sources. Please remember that the worksheet must be your OWN work.
You may use adapted texts / pictures, but please give credits. Thanks.
|
21 Sep 2009
|
|
|
|
|
|
|

ituska

|
|
thanks a lot :) I am going to try it
|
21 Sep 2009
|
|
|
moravc
|
Thanks a lot BAIBA !!!
FOR USERS OF WORD 2007 - Embed True Type Fonts in Word and PowerPoint 2007 Documents
EMBEDDING FONTS IN WORD 2007
1. CLICK MS OFFICE BUTTON on the left - choose "WORD OPTIONS" - select SAVE TAB on the left
2. PRESERVE FIDELITY - choose your DOCUMENT and then
3. check the box for "EMBED FONTS IN THE FILE" and "EMBED ONLY CHARACTERS USED in doc"
4. and SAVE your document AS DOCUMENT WORD 2002 so you can share it AT ESLPRINTABLES
MORE DETAILED - READ HERE:
First, click on the Microsoft Office Button in the upper left hand
corner and choose �Word Options�. Select the Save tab on the left.
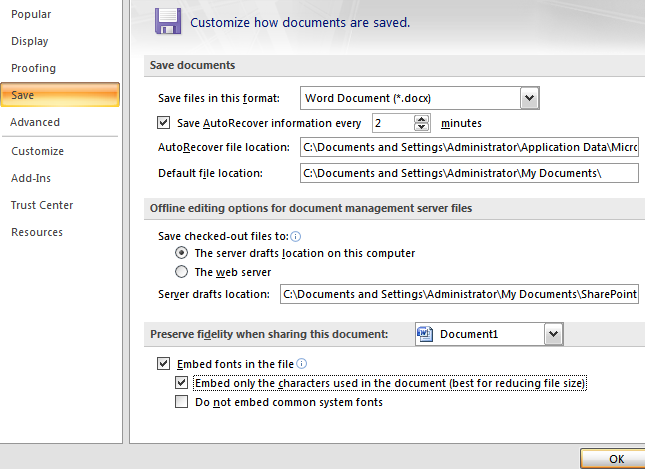
Under the �Preserve fidelity when sharing this document� section, first choose your document.
Then check the box for �Embed fonts in the file�, and �Embed only
the characters used in the document�. Now when you save that document,
the fonts will be embedded for everyone to see.
|
21 Sep 2009
|
|
|

Naty1776
|
|
It�s very useful Moravc!!! You are great! I will try it!!!
Thanks for sharing!!!
Hugs, Naty |
22 Sep 2009
|
|
|